What To Do After Publishing A Blog Post: 8 Steps To Follow For Success
So you’ve just finished writing a post, added pictures, clicked publish, and sighed in relief because your day’s work is finally done.
Hold on though!
Although you’ve accomplished a lot and publishing a good quality blog post is no small feat, there are still a whole bunch of steps you need to do before the process of writing a post is totally complete.
Here are 8 things you need to add to your to-do after hitting the publish button on your new post.
But before I move on, if you haven’t started a blog yet, follow my easy step-by-step guide on how to start your own blog here for just $2.95/month!
Also, check my post on how to write blog posts faster so you can be more efficient and save time.

1. Re-read your post
The very first thing you want to do is re-read your post.
You don’t know how many times I think I’ve read over a post enough times to only find that after I hit publish, I missed linking potential retailers that cost me hundreds of dollars of affiliate income or found out that I had left one or two typos in my work.
When you’re too close to a piece of writing because you’ve spent hours on it, it’s easy to overlook something that you would have easily not missed if you came back to it a while later.
Sometimes taking a break and time away is a good thing, especially in this case!
Here are some things to look for when you’re re-reading your post.

Start A Money-Making Blog In Just 5 Days
Join the FREE email challenge to start your own profitable blog in just 5 days when you join our newsletter.
Check that the text is laid out well and easy to read
After you publish a post, go view the page on your actual blog and look at the page as if you were looking at it through the eyes of your audience.
Does what you’re saying make sense?
Is the page laid out in an easy to read manner?
Is the font too small?
Some things might pop up to you that you didn’t notice before when you were only editing your post in draft view.
Check that you’ve added all appropriate images
It’s always a good idea to see if the images you’ve uploaded look right when they’re displayed on the page.
Do the images look blurry or distorted?
Check your grammar, spelling, and punctuation
Get a proofreading app that will make sure your grammar and punctuation is on point when you’re writing and editing your post.
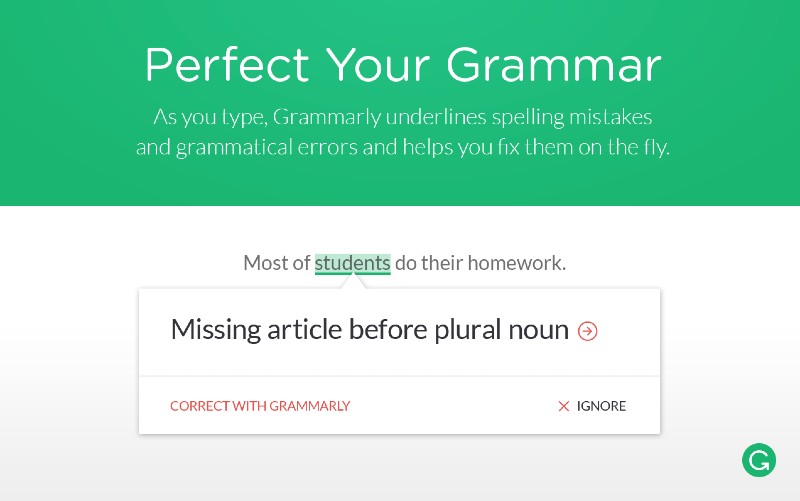
Grammarly is my favorite for this and has saved many blog posts of mine.
All you need to do is download the extension, and then it learns your personal writing style and vocabulary preferences.
This add on is great because it automatically alerts you of any grammatical errors, spelling errors, and synonym suggestions so you can focus on creating good quality content instead of spending your time worrying about grammar and spelling mistakes.
Another great thing about it is that you can also turn it on and off at any time if you don’t want any disruptions when you write. It also works wherever you type on the web so it’s not just limited to using it in your blog posts.
Try Grammarly today – it’s totally free to sign up!

Click all internal and external links to make sure they’re correctly linked
Make sure that you click through every link that you’ve linked to be sure that they’re going to the right pages.
Sometimes you’ll accidentally link a broken page or to an unintended link when you’re copying and pasting links so double-checking is always a good thing to do.
Check you’ve added appropriate affiliate links and marked them as no-follow
The worst thing is when you have a great post that brings in a lot of traffic but you failed to link potential retailers that could have earned you a large sum of affiliate income.
Don’t make this mistake and double-check that you’ve added the appropriate affiliate links to your post.
Also, make sure that you mark them all as no-follow so that Google doesn’t ding you for it!
2. Link your new post in old posts
After you’ve re-read your post and everything looks good, add old blog posts that are relevant to the subject into your new post. Also, do the same by going through any old posts that you can also link the new post into.
Doing this will add SEO juice to your post and will also help decrease the bounce rate on your site because it’ll keep people on your site for a longer period of time.
3. Make 3 to 5 pins for Pinterest
After you’ve finalized the meat of your post, it’s time to actually promote your blog post by making pins for Pinterest. Because what good is a blog post if no one is looking at it!
Pinterest is one of the best ways for your posts to be seen by thousands of people in a short amount of time. It’s one of the best social media platforms that I recommend for new bloggers because it takes less time to see results in traffic to your site compared to waiting for your site to rank in Google.
If you haven’t used Pinterest yet, I recommend that you check out my post on how to set up and optimize your Pinterest account to set yourself up for success.
If you use already Pinterest, you know how important it is to have fresh, attractive pins that are scheduled out daily to promote your post on the platform.
To be super efficient, I recommend making 3 to 5 pins for Pinterest right off the bat after you finish a post in Canva.
Canva is super easy to use, totally free if you decide not to use their Pro version, and you don’t need any sort of design experience if you’re not great in the artistic area.
In fact, you can use Canva templates that are specifically for Pinterest if you’re looking to design pins fast! Purchase these once and you’ll be able to use them over and over again.
4. Schedule to social media
Once you’ve created your pins, it’s time to schedule them to Pinterest.
I use and recommend Tailwind to schedule pins to Pinterest. To me, this is one of the greatest investments you can make on your blog if you use Pinterest to market your blog.
With Tailwind, you can schedule out your pins in advance, pin at the most optimal times when your audience is active on Pinterest, and send traffic to your blog even while you’re asleep. It really helps save you time so you can spend those precious hours working on your blog instead of pinning 24/7.
Click here to get 1-month of Tailwind for free and see how it helps grow your blog traffic!
Don’t forget that you can also schedule your posts to other social media outlets such as Twitter, your Facebook page, and Instagram. However, I recommend putting most of your time and effort into Pinterest at first because you’ll yield more traffic from there compared to the other three.
Of course, all of this will depend on where your target audience is so be mindful of where they hang out when you’re deciding on where to promote your posts.
5. Share to your groups
After you’re done scheduling, if you’re a part of any Facebook blogger groups, it’s time to share these posts there.
This is definitely time-consuming as you have to reciprocate and share other blogger’s posts but it can be worth it if you’re just starting out.
6. Email your list
If you have an email list, it’s time to send out a newsletter with your new post to your readers who want to hear from you.
This is a great way to bring traffic to your blog because if you have a loyal fan base, they’re going to want to read what you say and click on your blog post link.
Just be sure that you don’t send them a new email every time you have a new post because this can actually work against you.
You have to add value to their lives which means nurturing your list, getting creative, and knowing your audience’s needs.
Constantly dumping your new post in an email without adding value to your readers is a no-no.
Emailing your list is of course optional. If you don’t yet have a subscriber base, make opt-in freebies that will incentivize readers to sign up to your subscription list.
7. Check your analytics

Finally, once you’ve promoted your post, it’s time to check your Google analytics and find out how your post performed.
Take a look at what happened with the post and ask yourself:
Were people receptive to what you said?
Which social media outlet did you find the most success with? Which pin design did the best?
How could you better improve your post now and in the future?
Were you able to monetize the post as best as possible?
8. Answer comments
Lastly, it’s important to revisit the post and take the time to answer any comments that your readers left on your site.
This is a great way to foster a relationship with your viewers so that they feel like you’re a real person and can relate to you. They’ll appreciate that you took the time out of your busy day to interact with them.
More Blogging Tips For Beginners
- 20 Things You Should Do Right After You Start A Blog
- 8 Ways To Drive Traffic To Your Site For Free
- How To Legally Protect Your Blog And Business With Legal Contracts
- 50+ Tools & Resources To Run A Profitable Blog
- 6 Ways To Make Money Blogging Online
- 7 Best Affiliate Programs For Beginners

Liked this post? Please share it!
The one thing I always fail to do is post to Pinterest. I know this is something I really need to devote time to! All of these are really great tips!
Thanks! I hope you get lots of traffic from Pinterest once you start posting!